
Last updated: October 31, 2026
Affiliate Disclosure: Shelter Tactics is reader-supported. When you buy through links on this page, we may earn a commission at no extra cost to you. As an Amazon Associate, Shelter Tactics earns from qualifying purchases. Learn more.
The short version: hang a tarp on a continuous ridgeline — one cord run tight between two trees, the tarp clipped to it with two prusik loops so it can slide to centre and then lock. Bowline on the first tree, trucker’s hitch on the second, taut-line hitches on the guy lines. That one system, plus four pitches chosen by weather, covers nearly every night a tarp is the right shelter. Everything below is the cord maths, the knots in order, and the mistakes that leave people wet.
One note on how this page was built: we don’t stage field tests. The steps below are the published methods of REI, Alpkit, and DD Hammocks’ own setup guidance, cross-checked against each other, with the worked example run on the tarp size most readers actually own — a 10-by-10-foot square tarp with reinforced loops, the DD Tarp 3×3 being the common one (3 m by 3 m, 19 tie-outs, 790 g before pegs and lines). Where a number is geometry rather than opinion, we show the geometry.
How much cord do you actually need for a tarp?
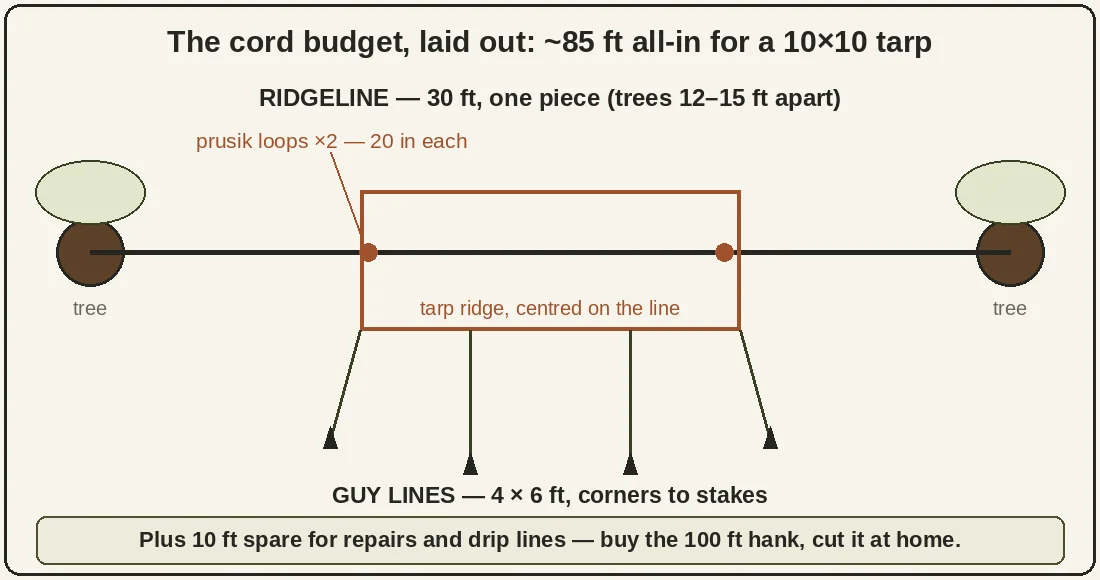
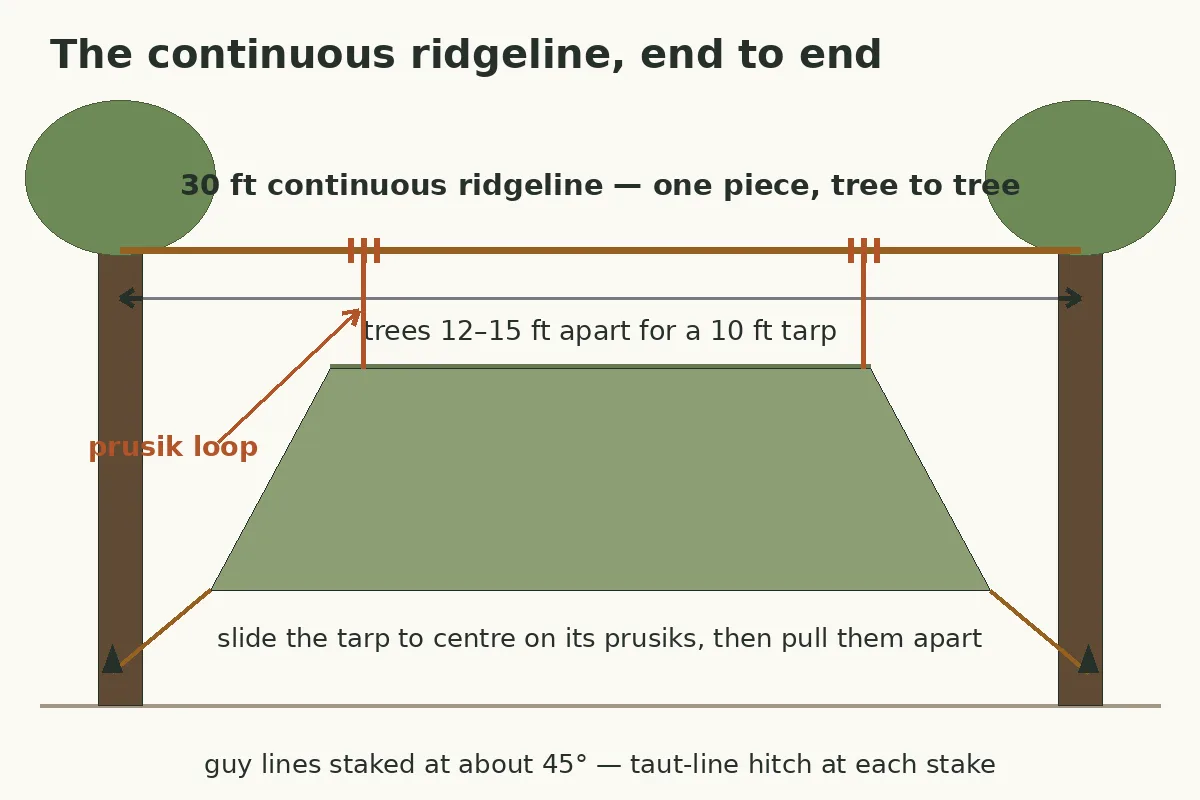
A continuous ridgeline for a 10-by-10 tarp takes 30 feet of cord, and that one number is where most first pitches go wrong — people bring the 15-foot hank that came in a bundle and end up tying corner to corner. The 30 feet breaks down like this: the trees are usually 12 to 15 feet apart, each end needs a wrap and a working tail, and the trucker’s hitch eats length every time you tension it. Hammock hangers settled on 25 to 30 feet for the same job years ago; 30 gives you the tail you will want.
| Piece | Length | Job |
|---|---|---|
| Ridgeline | 30 ft, one piece | Tree to tree |
| Guy lines | 4 × 6 ft | Corners to stakes |
| Prusik loops | 2 × 20 in loops | Tarp to ridgeline |
| Spare | 10 ft | Repairs, drip lines |
That is roughly 85 feet of cord all-in, which is why the classic A-frame kit list — a tarp, 50 feet of paracord, and six stakes — only works when the trees cooperate and the guys stay short. Buy a 100-foot hank, cut it once at home, and melt the ends. One more choice matters: nylon paracord stretches, and it stretches more when wet, so a pitch that was drum-tight at supper sags by 2 a.m. Polyester and dyneema cord barely stretch at all. If paracord is what you own, it works — just plan to re-tension after the rain starts, and know that the sag is the cord, not your knots.
Our Tarp Size & Cordage Calculator runs this same maths for your tarp size and pitch — people and coverage in, ridgeline length and cordage out.
Continuous ridgeline or two separate lines — which should you use?
The continuous ridgeline is the easier system to live with, and it is the one this page teaches. One line goes up first and gets tensioned on its own. The tarp then hangs from two prusik loops on that line, so you can slide the whole shelter left or right until it sits exactly over your bed or your hammock, and slide it again in the morning without re-tying anything. The line also carries the tarp’s ridge, so wind load spreads along the cord instead of tearing at two corner loops.
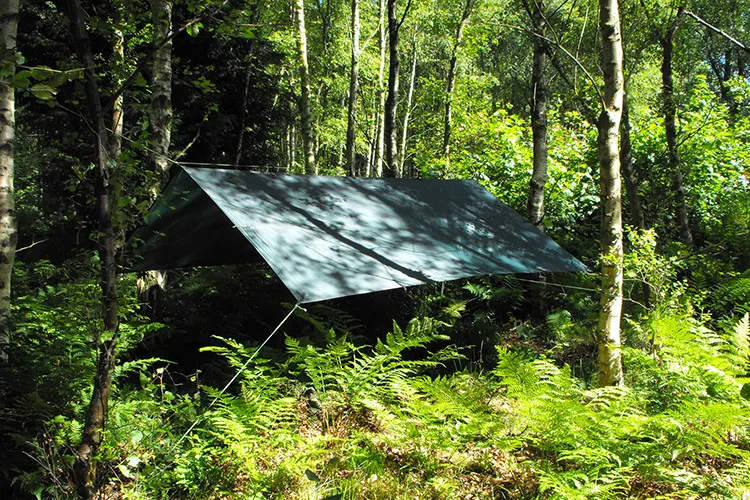
A split ridgeline — one short line from each end of the tarp to its tree — is lighter and packs smaller, and plenty of experienced hangers prefer it. Its cost shows up at setup: centring the tarp means adjusting both ends against each other, and there is no line over the ridge to clip a light or a stuff sack to. Neither system is wrong. If you are learning, learn the continuous line first; it forgives the most mistakes, and every knot in it transfers to the split system later.
What knots do you need to hang a tarp?
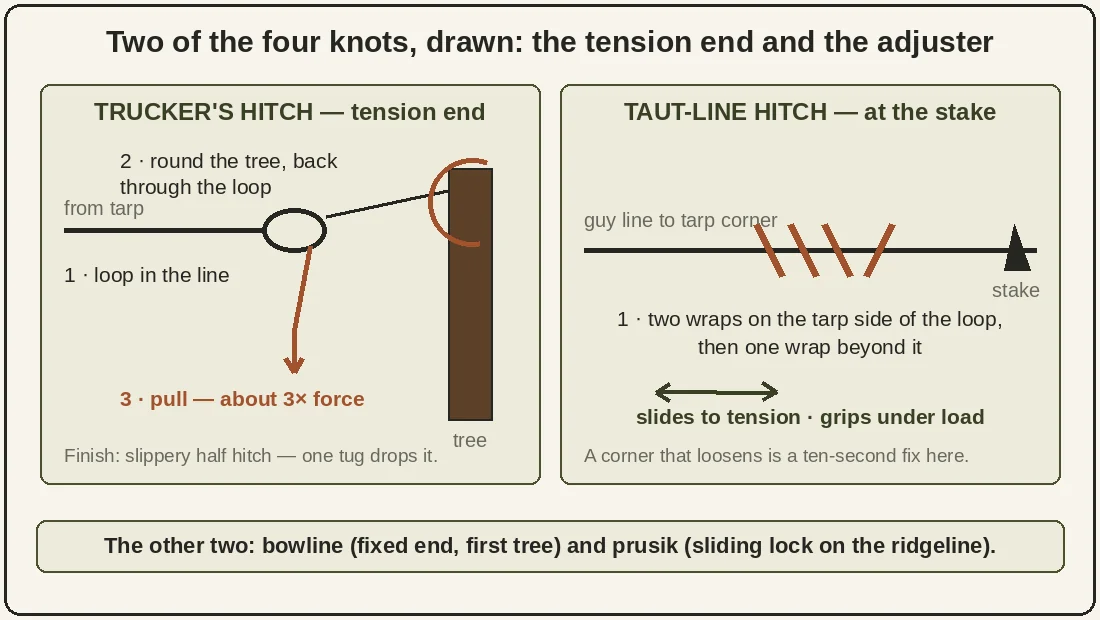
Four knots hang a tarp, and only four. A tarp kit that needs a knot you have to look up in the rain is a kit that gets pitched badly, so these are chosen because each one does a job the others cannot, and each can be tied with cold hands after a little practice at home.
- Bowline — the fixed end. Tie it around the first tree. It makes a loop that will not slip or jam, and it unties easily after a night of load, which is the whole reason it beats a clove hitch here. Leave a long enough tail that the knot can be worked loose in the morning.
- Trucker’s hitch — the tension end. At the second tree, the trucker’s hitch turns your pull into roughly three times the force, which is how a ridgeline gets tight enough to ring when you flick it. Finish it with a slippery half hitch — a bight instead of the bitter end — so one tug on the tail takes the whole thing down.
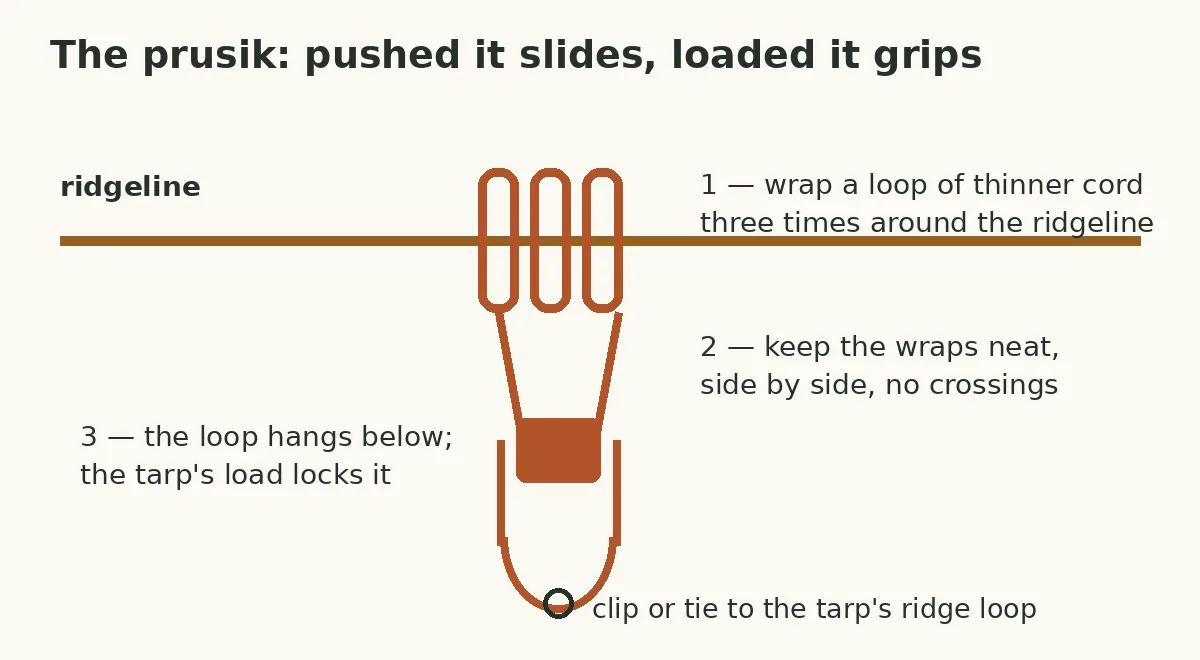
- Prusik — the sliding lock. A prusik is a loop of thinner cord wrapped two or three times around the ridgeline. Pushed by the knot, it slides; loaded by the tarp, it grips and holds. One prusik at each end of the tarp’s ridge is what lets the shelter move along the line and then stay put. Use cord clearly thinner than the ridgeline, or it will not grip.
- Taut-line hitch — the adjuster. Tie it where each guy line meets its stake. It slides to tension the guy and holds under load, so a corner that loosens overnight is a ten-second fix at the stake instead of a re-pitch.
How do you hang a tarp, step by step?
The order matters more than speed: line first, tarp second, guys last. Working this sequence, a practiced pitch takes about ten minutes; a first one takes twenty, which is why the hub’s oldest advice stands — the first time you hang a tarp should not be in the rain at dusk.
- Pick the trees and the ground. Two sound, living trees roughly 12 to 15 feet apart for a 10-foot tarp, over ground that is flat and not the low spot water runs to. Look up before anything else: dead branches overhead — widow-makers — are the one tarp hazard no knot fixes. Move, don’t risk it.
- Run the ridgeline. Bowline around the first tree at about head height for a camp shelter, chest height for a low sleeping pitch. Walk the line to the second tree, trucker’s hitch it tight, and get the sag out now — a loose ridgeline cannot be fixed by tight guys later.
- Hang the tarp on prusiks. Clip or tie each end of the tarp’s ridge line of loops to a prusik, slide the tarp to centre, and pull the two prusiks apart until the ridge is taut. Do not just drape the tarp over the line: a draped tarp slides downhill along the cord and sags into folds, which is the single most common bad pitch in every guide we checked.
- Guy out the corners. Stake the four corners out at roughly 45 degrees from the tarp’s corners, taut-line hitch at each stake, and tension until the panels are smooth with no diagonal wrinkles. A wrinkle is a water channel; it points exactly where the drip will land.
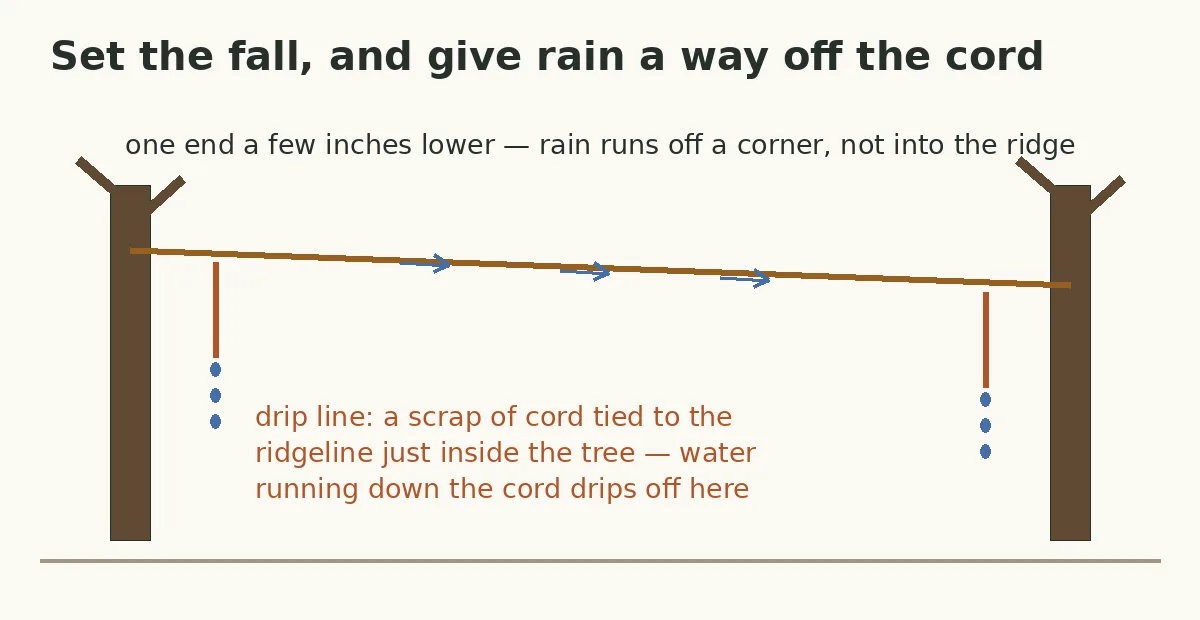
- Set the fall. Drop one end of the ridgeline a few inches lower than the other, or lower one side, so rain runs off a corner instead of pooling at the ridge. Then hang two short drip lines — scraps of cord tied to the ridgeline just inside each tree — so water running down the cord drips off before it reaches the tarp.
Which tarp pitch should you use for the weather you have?
The A-frame is the default pitch because its steep sides shed rain and it goes up on the plain ridgeline you just hung. The other three pitches below are the same tarp and the same knots, rearranged — a square 10-by-10 with centre loops, like the DD 3×3’s 19 tie-outs, is popular precisely because it folds into all of them.
| Pitch | Best for | Ridgeline | Weak spot |
|---|---|---|---|
| A-frame | Rain, general use | Centre, level | Open ends |
| Lean-to | Wind from one side | One edge, high | Rain from behind |
| Diamond | One person, hammock | Diagonal | Less floor cover |
| Flat / porch | Sun, group cooking | Centre, high | Pools in rain |
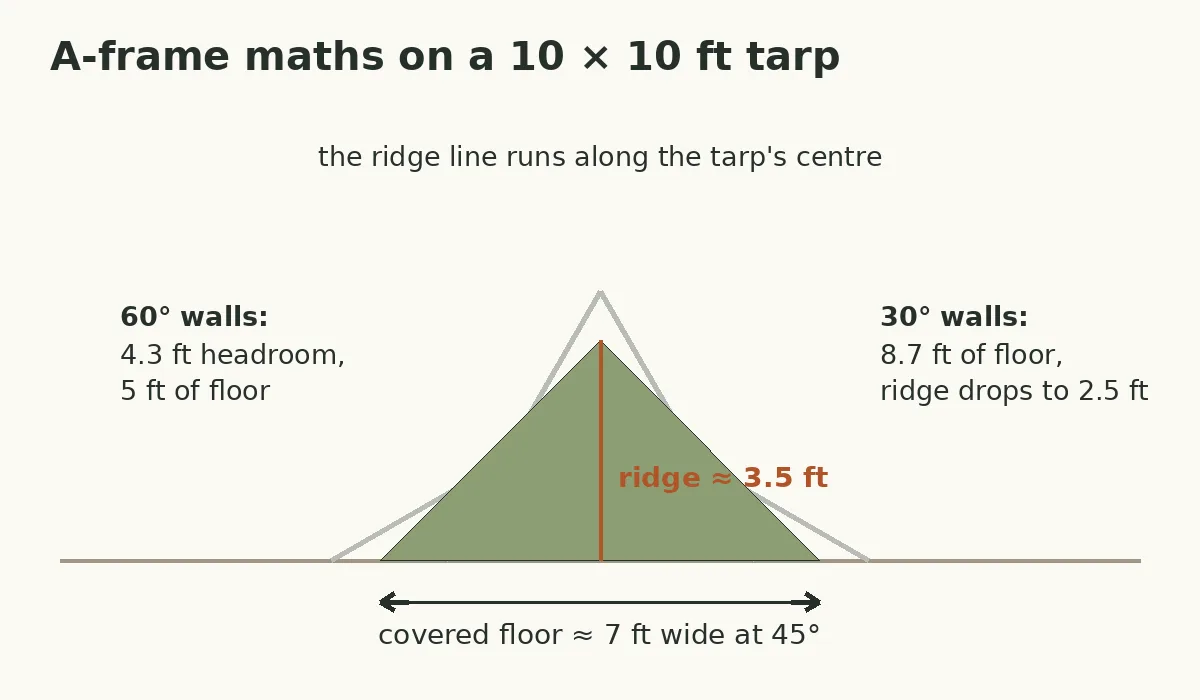
How the A-frame maths works: on a 10-by-10 tarp, wall angle decides the trade. Pitched with the sides at 45 degrees, the ridge sits about 3.5 feet high over a covered floor roughly 7 feet wide — room for two sleeping pads, not room to stand. Drop the walls to 30 degrees and the floor widens to about 8.7 feet but the ridge falls to 2.5 feet, a crawl-in shelter. Raise them to 60 degrees and you get 4.3 feet of headroom over only 5 feet of floor. There is no free headroom; there is only where you spend the width.
The lean-to hangs the tarp’s top edge on the ridgeline and stakes the bottom edge to the ground on the windward side, making a wall and a roof in one. It is the warmest pitch next to a fire and the fastest windbreak, and it fails the moment the wind swings behind it. The diamond hangs the tarp by opposite corners over a hammock or a single bed — the long diagonal gives the most ridge length from the smallest tarp, at the cost of thin coverage at the sides. The flat pitch is a roof, not a shelter: wonderful over a cooking area on a still evening, and a rain-collecting sail the moment weather arrives, unless one corner is dropped well down as a drain.
Why does a tarp sag and pool water overnight?
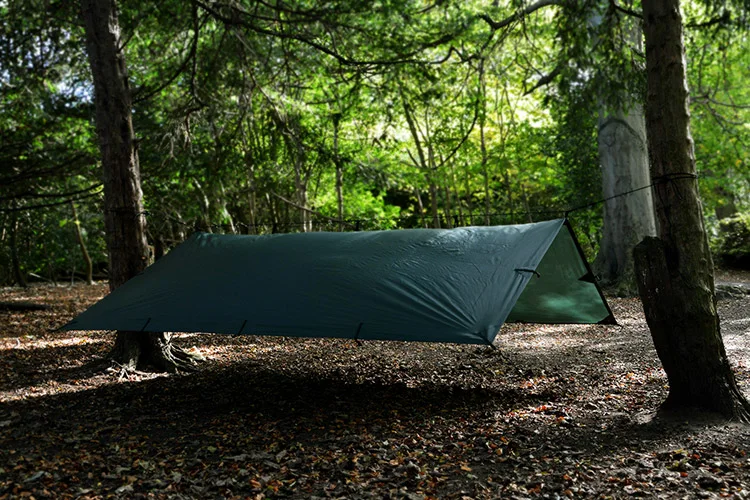
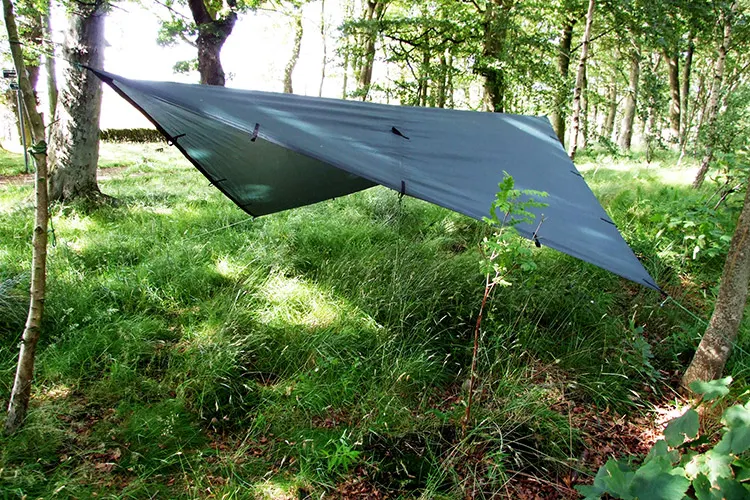
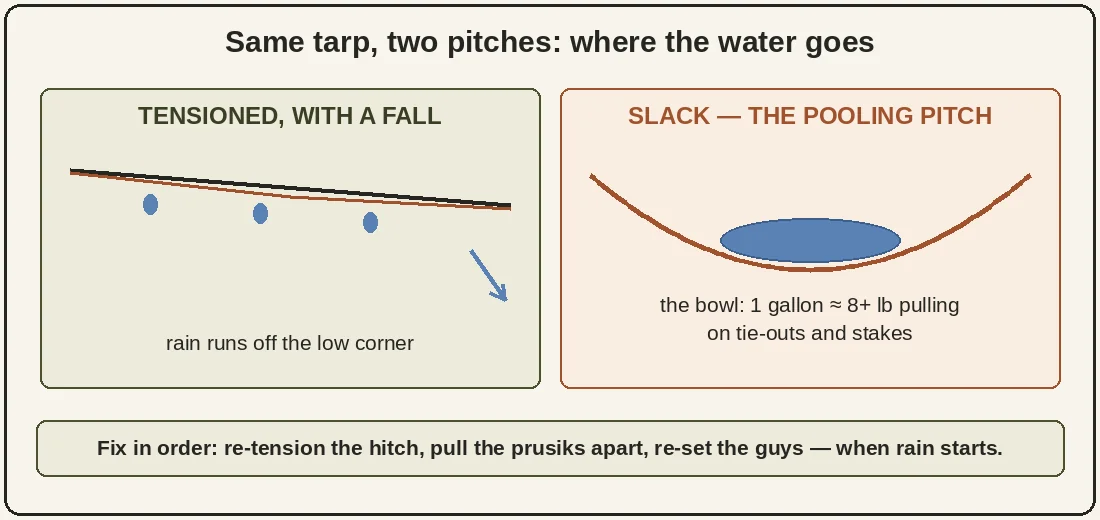
A pooling tarp is almost never the tarp’s fault. Water collects where the fabric can form a bowl, and a bowl forms for three reasons, in this order: the ridgeline was not tight to begin with, the tarp was draped instead of tensioned out to its prusiks, or the cord stretched — wet nylon paracord again — and handed the fabric the slack it needed. The fix is the same sequence run in reverse: re-tension the trucker’s hitch, pull the prusiks apart, then re-set the guys. Do it when the rain starts, not after the pool has weight, because a gallon of pooled water weighs over eight pounds and that load is what tears tie-outs and pulls stakes.
Two smaller habits help. Pitch with a slight fall built in, as in step 5 above, so water always has a downhill corner to leave by. And on silnylon tarps, expect the fabric itself to relax when wet — silnylon sags as it absorbs water in a way silpoly does not, which our Shelter & Sleep hub flags in its fabric notes. A midnight re-tension is normal with silnylon, not a sign you pitched it wrong.
What do you do when there are no trees?
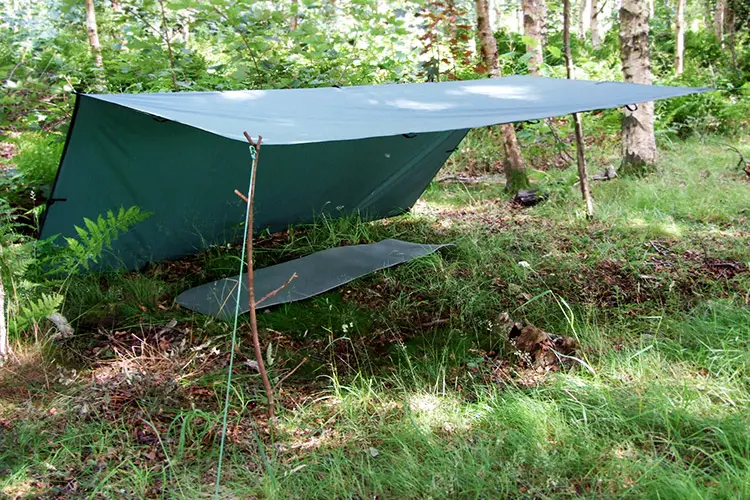
Poles replace trees, and the pitch barely changes. Trekking poles set to about 125 cm — a little over four feet — stand at the two ends of the ridge, tips through the tarp’s end loops, with a guy line run out from each pole top to a stake to hold it upright. Stake one end’s guys first, walk the tarp out, then set the second pole and tension everything from the corners. The same method works with dedicated tarp poles or two sound sticks. What poles cannot give you is the ridgeline’s forgiveness: without a tree-to-tree line, the tarp’s own ridge carries the load, so keep the pitch lower and the guys wider than you would between trees, and expect a pole pitch to need one re-tension as everything settles.
Questions readers ask about hanging a tarp
How long should a tarp ridgeline be?
Thirty feet of cord for a 10-foot tarp between typical trees — the span, two tree wraps, and the tail the trucker’s hitch consumes. Twenty-five feet is the floor for hammock spacing. Longer is easy to coil; shorter ends the pitch before it starts.
Can I hang a tarp with paracord?
Yes — paracord is strong enough many times over, and it is what most kits carry. Its flaw is stretch: nylon cord lengthens under load and more when wet, so the pitch sags overnight. Polyester or dyneema cord holds tension; with paracord, plan one re-tension after rain starts.
Which side of a tarp faces up?
The coated side faces the weather on most camping tarps, and the maker’s instructions settle it for yours — DD, for example, builds its 3×3 with a PU-coated, seam-taped face meant to take the rain. When in doubt, put the side with the taped seams and loop stitching facing up and out.
What is a prusik knot for on a tarp?
A prusik connects the tarp to the ridgeline so the shelter can be centred after the line is tight. The loop slides along the cord when you push the knot and locks when the tarp pulls on it. Two prusiks, one at each end of the ridge, also tension the tarp along the line.
How do I stop rain running down the ridgeline into my shelter?
Tie a short scrap of cord around the ridgeline just inside each tree, with the tail hanging down. Water travelling along the main cord reaches the scrap and drips off its low tail instead of continuing under the tarp. These drip lines cost two minutes and two offcuts, and they work every night it rains.
Can you hang a tarp without trees?
Yes. Two trekking poles at about 125 cm, tips through the ridge loops and held by guy lines to stakes, carry the same A-frame. Pitch it lower and guy it wider than a tree pitch, because the tarp’s ridge, not a separate line, now carries the load.
Keep reading
This guide belongs to our Shelter & Sleep hub, where the tarp comparison that follows this how-to will land. The maths behind the cord table lives in the Tarp Size & Cordage Calculator, and hammock hangers get the same treatment — angles, strap height, tension — in the Hammock Hang Calculator. Once the shelter is up, the next skill in the sequence is fire: Ferro Rods Compared covers the rods and the technique that pairs with a dry camp.
Talk it over with other readers. The Shelter Tactics Community on Facebook is where readers compare notes on knives, lights, packs, and the rest of the kit — and where your questions help decide what we research next. Join the group →