
Last updated: November 1, 2026
Affiliate Disclosure: Shelter Tactics is reader-supported. When you buy through links on this page, we may earn a commission at no extra cost to you. As an Amazon Associate, Shelter Tactics earns from qualifying purchases. Learn more.
The short version: sharpen a bushcraft knife at the angle its maker already ground into it — lay a Scandi bevel flat on the stone and let the bevel set the angle, and hold most flat-ground camp knives at 20 degrees per side. Work one side until you can feel a burr along the whole edge, do the same on the other side, refine once on a finer grit, then strop the burr off. That is the whole skill. Everything below is how to do each of those four things without wrecking the edge you started with.
One note on how this page was built: we don’t stage field tests, and we didn’t invent a method. The steps below are the published methods of Montana Knife Company, Paul Kirtley’s bushcraft school, and Sharpening Supplies, cross-checked against each other and against the factory specs of the six knives in our fixed-blade comparison. Where the makers publish an angle, we print the maker’s number. Where they don’t, we say so instead of guessing.
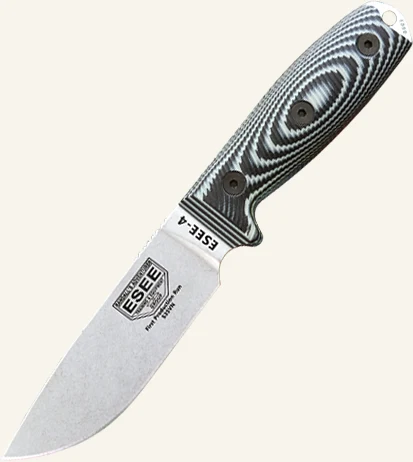
What angle do you sharpen your knife at? Start with the knife you own
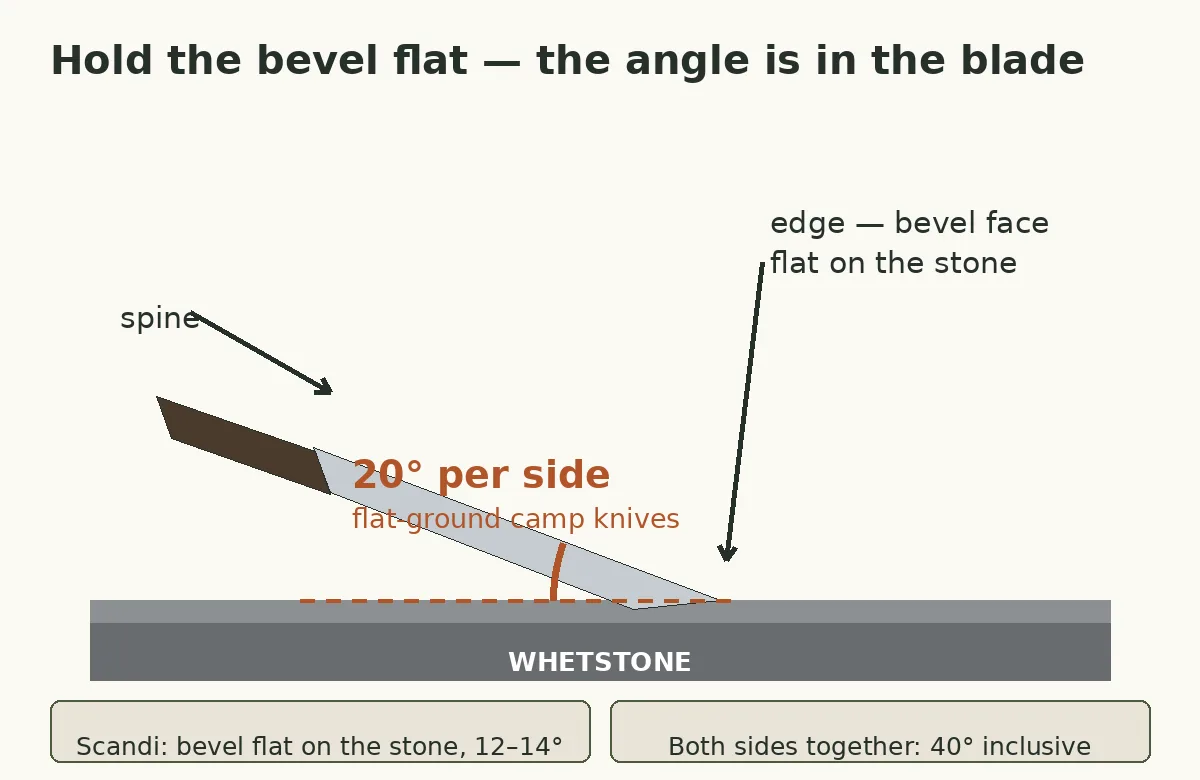
Your knife’s factory angle is the answer, because the edge already sits at that angle and matching it removes the least steel. Every angle in this table is per side — one bevel, measured from the blade’s center line. Add both sides together and you get the “inclusive” number some brands print instead. Half the arguments about sharpening angles are two people using the two different numbers for the same edge.
| Knife | Steel | Grind | Angle, per side |
|---|---|---|---|
| Morakniv Companion | 12C27 stainless | Scandi | About 12° |
| Morakniv Garberg | 14C28N stainless | Scandi | About 14° |
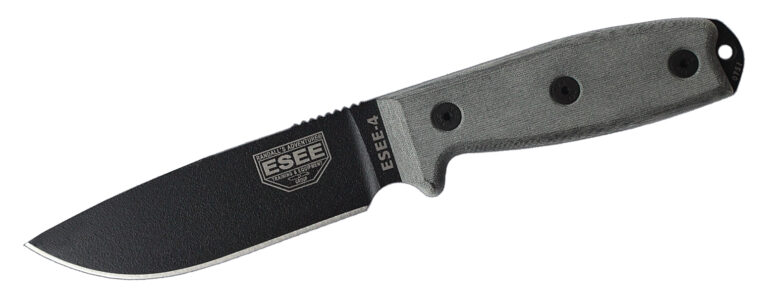
| ESEE-4 | 1095 carbon | Flat | 20° |
| Ka-Bar Becker BK2 | 1095 Cro-Van carbon | Flat | 20° |
| Gerber StrongArm | 420HC stainless | Flat | 20–25°* |
| Cold Steel SRK (SK-5) | SK-5 carbon | Flat | 20–25°* |
How you hold each one:
- Morakniv Companion: Lay the wide bevel flat on the stone — the bevel is the guide. Thinner Scandi blades (2.5 mm and under) run about 12 degrees a side.
- Morakniv Garberg: Same flat-bevel method. The Garberg’s blade is 3.2 mm thick, and thicker Scandi blades run about 14 degrees a side. Garbergs also ship with a tiny factory micro-bevel — see the Scandi section below before you try to sharpen it off.
- ESEE-4: ESEE’s own figure: its FAQ says edges are applied by hand at 20 degrees per side and “may vary slightly.” Hold 20 and let the marker check (Step 1) confirm it.
- Ka-Bar Becker BK2: KA-BAR grinds the Becker line to a 20-degree edge. On a blade this thick (a full quarter inch), staying at exactly 20 matters more than speed — a wobbled stroke rounds a lot of steel.
- Gerber StrongArm: Gerber publishes no factory angle we could find. Guides and owners land at 20 to 25 degrees a side for this knife; 20 is the place to start, and 420HC forgives practice — it sharpens fast on any stone.
- Cold Steel SRK (SK-5): Cold Steel publishes no factory angle we could find either. Heavy-use guidance for blades in this class runs 20 to 25 degrees a side; pick 20, write it on tape on the handle, and use the same number every time.
* No factory spec published — the range is the working consensus for the knife’s class, not the maker’s number. If your knife isn’t in this table, the fallback is simple: a Scandi grind gets sharpened bevel-flat, and a flat-ground camp knife gets 20 degrees per side until its maker tells you otherwise. Not sure which steel is in your hand? Our Knife Steel Lookup lays 21 common steels side by side.
For reference, the three knives this page leans on hardest were price-checked on Keepa today, October 23, 2026: the Morakniv Companion at $19.89, the ESEE-4 at $119.87, and the Morakniv Garberg at $129.99. All three were third-party New offers — Amazon direct was out of stock on all three, and the Garberg had no Buy Box at all today, which is why its price sits well above the $79.99 we verified for it on October 16. Prices last checked: October 23, 2026.
What are the steps to sharpen a bushcraft knife on a whetstone?
The steps below sharpen any knife in the table. You need a stone (the grit section below picks it), a permanent marker, a damp towel, and a leather strop or an old belt. A combination water stone gets soaked for 10 to 15 minutes first and stays wet the whole session; a diamond plate needs no soak and no water beyond a splash.
Step 1 — Set up and mark the bevel. Put the stone on the damp towel so it can’t slide, short side facing you. Color the bevel — the angled face that runs down to the edge — with the marker, heel to tip, both sides. The marker is not decoration. After two light passes it tells you the truth about your angle: marker gone from the middle of the bevel means you’re close; marker left near the edge means you’re holding the spine too high; marker left up at the shoulder means you’re too flat. Adjust until a pass wipes the bevel evenly, and only then start counting strokes.
Step 2 — Work the first side until it burrs. With the edge facing away from you, push the knife away and across the stone so the whole edge, heel to tip, crosses the stone’s face. As the blade curves up toward the tip, lift the handle slightly — raise your elbow rather than bending your wrist — or the tip never touches the stone. Count your strokes in sets. Paul Kirtley’s school teaches sets of eight on one side, then eight the other way, repeated; Montana Knife Company works one side until the burr forms, then flips. Either system works. What doesn’t work is flipping at random, because you lose count of how much steel came off each side and end up with one bevel wider than the other.
Step 3 — Check for the burr before you flip. A burr is a foil-thin lip of steel that folds over the edge when the two bevels finally meet. Run a fingertip down the bevel, from spine toward edge — never along the edge — and the burr catches on the ridges of your fingerprint. No burr along the full length means you have not reached the edge yet, and flipping now just polishes the shoulder. If the burr runs along only part of the edge, give that stretch more strokes until it catches up. This one check is the difference between sharpening and just scratching a bevel.
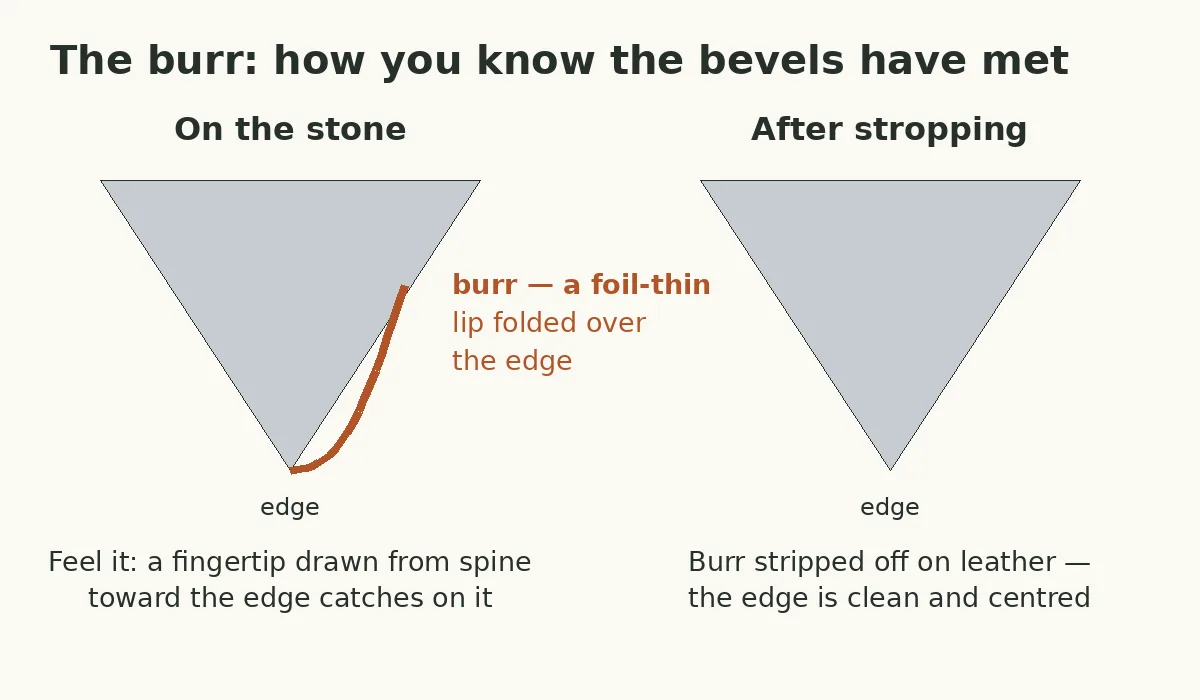
Step 4 — Repeat on the second side, then alternate. Flip the knife and raise a burr along the whole second side. Then alternate single strokes — one away, one toward — ten to twenty times, easing the pressure off with each pass. Equal time on both sides keeps the edge centered; an edge sharpened mostly from one side cuts with a steering pull, like a cart with one small wheel.
Step 5 — Refine once, with less pressure. Move to your finer grit and repeat the pattern with a lighter hand: a few sets of eight, then alternating singles. On a 3000-grit stone the burr can be too fine to feel, so read the bevel instead — you are done with a grit when its scratches have replaced the coarser scratches from the grit before it, evenly, heel to tip.
Step 6 — Strop the burr off. Lay the blade on leather — a strop, or a plain belt pulled taut — and draw it spine-first, edge trailing, so the edge skims the leather instead of cutting into it. Ten to fifteen passes a side for a flat-ground knife; Kirtley’s school gives a Scandi edge 50 to 100 strokes, because the bevel is wide and the leather has more face to polish. Slightly raise the angle over the bevel angle so the leather kisses the very edge. Stropping is not the optional flourish at the end: skip it and the burr you raised in Step 3 stays on the edge as a wire that folds over on the first stick of wood.
Step 7 — Test it the way you’ll use it. Slice down through a held sheet of printer paper. A sharp edge glides heel to tip in one clean pass; a dull spot catches, tears, or folds the paper, and it tells you exactly where it is. For a bushcraft knife, add the real test: shave a curl off a dry stick. Feather-stick curls that come off thin and unbroken mean the edge is ready for the work the knife actually does. Then dry the blade, and if it’s carbon steel — the ESEE-4, the BK2, the SRK — wipe on a thin film of oil before it goes back in the sheath.
What grit do you start on — and where do you stop?
The right starting grit is decided by the edge in front of you, not by the stone you happen to own. Starting too fine on a truly dull knife is the slowest, most discouraging way to learn this skill.
| The edge in front of you | Start here | Then | Time it honestly takes |
|---|---|---|---|
| Chipped, nicked, or damaged | 400 grit (220–600 range) | 1000, then 3000 | 25–30 minutes |
| Dull — won’t bite paper or wood | 1000 grit | 3000 | 15–20 minutes |
| Working, but feels tuggy | 3000 grit, a few passes a side | Strop | About 5 minutes |
| Still cutting, just used | No stone — strop only | — | 1–2 minutes |
And here is where a bushcraft knife parts company with a kitchen knife: stop at 1000 to 3000 grit. A working edge finished in that range keeps microscopic teeth, and those teeth are what grip rope, bite into bark, and start a cut in wood instead of skating across it. Polishing on to 6000 grit and beyond makes an edge that push-cuts paper beautifully and slides on exactly the materials a camp knife cuts all day. Mirror edges are for razors and sushi. Your knife has firewood to make.
One warning about grit numbers: they are not one universal scale. A diamond plate cuts coarser than a water stone wearing the same number, because diamond particles don’t break down and round over the way a water stone’s abrasive does. Treat the table as ranges, not commandments, and let the burr — not the number on the box — tell you when a step is finished.
How do you sharpen a Scandi grind without ruining it?
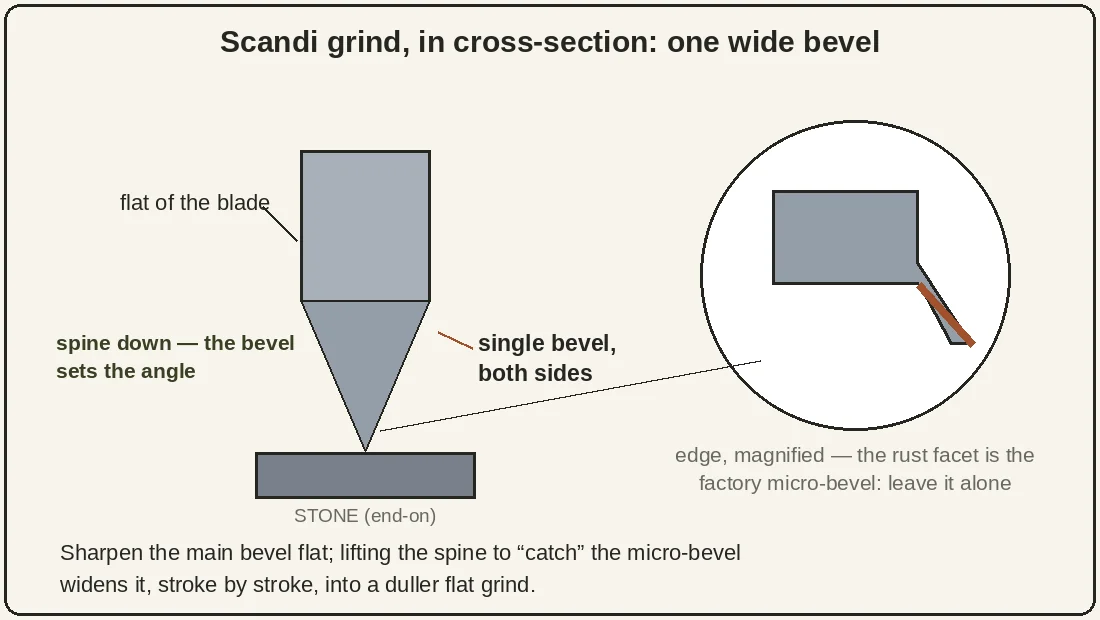
A Scandi grind — the Companion, the Garberg, most Moras — is the easiest edge in this article to sharpen and the easiest to spoil slowly. There is no angle to find: lay the bevel flat on the stone until the whole wide face sits flush, and the grind itself holds your angle for you. That wide face is also the trap. Every stroke removes steel from the entire bevel, so a Scandi sharpening is slower per stroke than a flat grind, and a lifted spine — even a degree or two, repeated for a year — rounds the bevel into a convex curve that no longer registers flat on the stone or bites wood the same way.
Two more Scandi specifics. First, work in sections if you need to: heel, middle, then tip with the handle lifted. Equal time per section keeps the bevel even along the blade. Second, the micro-bevel. Many Moras, the Garberg included, leave the factory with a hair-thin second bevel at the very edge, a fraction of a millimeter wide, ground a few degrees steeper for toughness. Sharpen the main bevel flat and leave it alone. If you lift the spine to “catch” that tiny bevel on every touch-up, stroke by stroke you widen it until the knife is a flat-grind knife with extra steps — and a duller one.
Do you push the knife into the edge, or draw it back?
Both strokes sharpen, and the sources behind this page don’t agree on one true direction — Kirtley’s method pushes the edge away and draws it back toward you in turn; plenty of schools work edge-trailing only. What decides the result is not the direction. It is whether the angle stays the same through the whole stroke, including the last inch where the tip leaves the stone. Pick one pattern, count it, and keep it. Changing direction mid-session usually means changing angle mid-stroke, and that — not push versus pull — is what rounds edges.
What about the black coating on an ESEE, a BK2, or an SRK?
The powder coat on a carbon-steel knife protects the flat of the blade from rust; it was never on the edge. The bare bevel below the coating line is the only part that ever touches the stone, so sharpen normally and don’t chase the scratches the stone leaves where bevel meets coating. Coating wear along that line is cosmetic — every working ESEE-4 and BK2 shows it, and owners who strip a sound coating off “to sharpen better” gain nothing but a blade that rusts in more places. What does need care is the exposed edge itself: carbon steel, a fresh stone-wet session, and a sheath is a rust recipe. Dry the edge, oil it lightly, then put it away.
How do you sharpen a bushcraft knife in the field?
In camp, you maintain an edge — you don’t rebuild one. The field kit is a pocket diamond plate or a small ceramic rod plus the belt you’re already wearing as a strop. Diamond earns its place out there: it cuts every steel in the table including the harder stainless, needs no soaking, can’t dish out of flat, and works with a splash of water or dry. Use a light touch — diamond bites fast, and pressure that a water stone forgives will gouge on a plate. Five to ten counted strokes a side at your home angle, then strop on the belt, and a knife that was merely tuggy is working again.
About the coffee-mug trick, since it comes up in every comment thread: the unglazed ring on the bottom of a ceramic mug really is a crude fine stone, and ten to fifteen light passes a side can bring back an edge that just lost its bite. It is a touch-up, not a sharpening. It will not fix a dull knife, it will not touch a chip, and its curve gives you no help holding an angle. A flat river stone with a fine, even grain is the same story — a way to keep working, never a replacement for the bench stones waiting at home.
How often does a bushcraft knife actually need the stone?
Far less often than new owners think, if you strop. The pattern experienced owners land on is the same across the forums and the schools: strop after each outing — a minute or two on leather — and the stones come out a few times a year, when stropping stops bringing the edge back, or after real damage like a nick from a knot or a staple in firewood. Every trip to a coarse stone removes steel you can’t put back. A knife stropped faithfully and stoned rarely will outlive its owner; a knife ground on a coarse stone every week is being slowly filed into a smaller knife.
The mistakes that dull more knives than use does
Wobbling the angle. The single most common failure. A stroke that starts at 20 degrees and ends at 26 polishes a rounded shoulder instead of an edge, and the knife comes off the stone duller than it went on. Slow down, lock your wrist, and let the marker expose the wobble before it costs you an hour.
Flipping before the burr. Switching sides because you did ten strokes and ten feels like enough. Without a burr running the full length of the first side, the bevels never met — you sharpened near the edge, not at it. The burr is the receipt. No receipt, no flip.
Pressing harder to go faster. Heavy pressure early on a coarse stone is normal; heavy pressure late, on the fine grit, tears the delicate edge you just built and can gouge the stone into a dish. The rule through every grit progression in this article is the same: pressure goes down as the grit goes up.
Jumping grits. From 400 straight to a polishing stone because the polishing stone is the fun one. The deep scratches from the coarse stone survive under the shiny surface, the edge stays rough where it counts, and it dulls in days. Each grit exists to erase the previous grit’s scratches. Skip one and its scratches stay.
Working a dry or dished stone. A water stone run dry loads with metal and cuts unevenly; a stone hollowed in the middle — dished, from months of center-focused strokes — rounds every bevel rolled across it. Keep water stones wet, and flatten them on a lapping plate or wet-and-dry paper on glass when a straightedge shows daylight at the ends.
Sharpening only the middle. The heel and the tip are where camp work happens — the heel starts feather sticks, the tip does the fine carving — and they are exactly the parts a lazy stroke misses. Count the tip’s lift into every pass, and check the paper test at the heel and tip, not just the sweet spot.
Reaching for a pull-through or an electric sharpener. On an inexpensive kitchen knife, fine. On a good fixed blade, these strip far more steel than the edge needed, at a fixed angle that matches nothing in the table above, and they can chip a hard edge. Montana Knife Company sends its own customers to stones and guided systems for a reason. A guided sharpener, for the record, is not cheating — it holds the one variable beginners can’t, and it beats a wobbled freehand edge every time.
The honest caveats
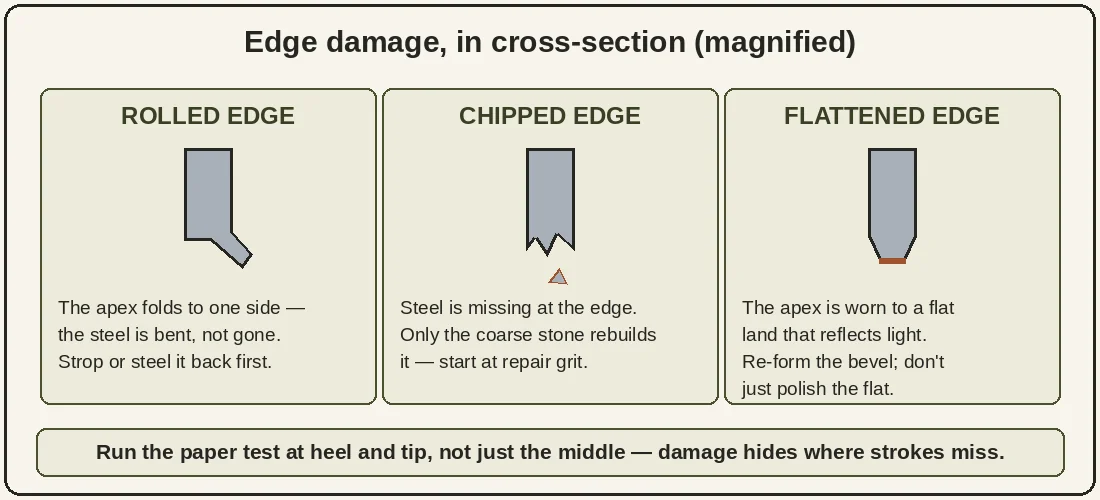
Three. First, factory edges are ground by humans: ESEE says plainly that its 20-degree edges “may vary slightly” because they are applied by hand, and every brand in the table is the same whether they print it or not. The marker check in Step 1 exists because your individual knife’s bevel outranks any number on this page, including ours. Second, a duller-feeling knife is not always a dull knife — a rolled edge, where the apex has folded to one side, feels blunt but needs only a strop or a ceramic rod to stand back up, not a full sharpening. Diagnose before you grind. Third, none of this rescues the wrong knife for the job: no angle makes a quarter-inch-thick blade slice like a thin one, and no grit fixes a grind that wedges. If the knife itself is the problem, our fixed-blade comparison scores six of them on the same card.
Questions readers ask
What angle should I sharpen my bushcraft knife at?
Match the factory edge: about 12 to 14 degrees per side for a Scandi grind, sharpened with the bevel laid flat on the stone, and 20 degrees per side for most flat-ground camp knives like the ESEE-4 and Becker BK2. Every angle here is per side — double it for the inclusive figure.
What grit whetstone do I need to start?
Start with the grit your edge’s condition calls for: 400 for chips and damage, 1000 for a genuinely dull knife, 3000 for a touch-up. If you buy one stone, buy a 1000/3000 combination water stone — it covers dull through working, which is where a bushcraft knife spends its life.
How do I know when my knife is sharp enough?
Use two tests. A sharp edge slices a held sheet of printer paper cleanly from heel to tip without catching or tearing, and it shaves thin, unbroken curls off a dry stick. If it passes paper but drags on wood, strop it — the burr is still on. If it tears paper, go back a grit.
Can you sharpen a knife with a coffee mug?
You can touch one up. The unglazed ring on a mug’s base works like a fine stone: ten to fifteen light passes per side at your normal angle can restore an edge that just lost its bite. It cannot repair a dull or chipped blade, and it gives you no help holding a steady angle.
Does stropping actually sharpen a knife?
Stropping removes almost no steel. What it does is straighten the microscopic fold at the edge and strip off the wire burr left by the stone, which is why a stropped knife feels dramatically sharper than the same knife unstropped. It maintains an edge; it cannot rebuild one that is truly dull.
Can I ruin my knife by sharpening it wrong?
On a stone, almost never. A wrong angle rounds the edge or widens a bevel, and both are fixable with more time on the stone. Real damage comes from power tools — a dry grinder or belt run hot can overheat the edge and pull the hardness out of the steel. Slow, wet, and by hand is safe.
Scandi grind or flat grind — which is easier to sharpen in the field?
Scandi, while you are learning — and it is not close. A Scandi’s wide bevel lies flat on the stone and sets its own angle, about 12 to 14 degrees a side, so there is no angle to hold: the steel teaches your hands. A flat grind sharpens at about 20 degrees a side, and holding 20 freehand is a skill — the marker check in Step 1 is how you build it, and a wobbled stroke rounds the edge instead of restoring it.
The trade runs the other way once an edge is truly dull. The Scandi’s wide bevel is a lot of steel to polish, so bringing one back takes longer, and rolling the bevel ruins the self-guiding trick. A flat edge touches up faster on a small field stone or a strop in practiced hands. Learning, cold, or tired in camp: Scandi. Experienced, and stropping little and often: flat — and either one beats a dull knife of the other grind.
Keep reading
This guide belongs to our Knives & Tools hub. The six knives in the angle table are scored head-to-head in Fixed-Blade Knives Compared, and the two finalists get a whole page to themselves in Morakniv Garberg vs ESEE-4. Once the edge is back, the skill that pairs with it is fire: Ferro Rods Compared covers the rods your knife’s 90-degree spine was ground to strike.
Talk it over with other readers. The Shelter Tactics Community on Facebook is where readers compare notes on knives, lights, packs, and the rest of the kit — and where your questions help decide what we research next. Join the group →